Tutorial: Build an EBRAINS App with Vite and React
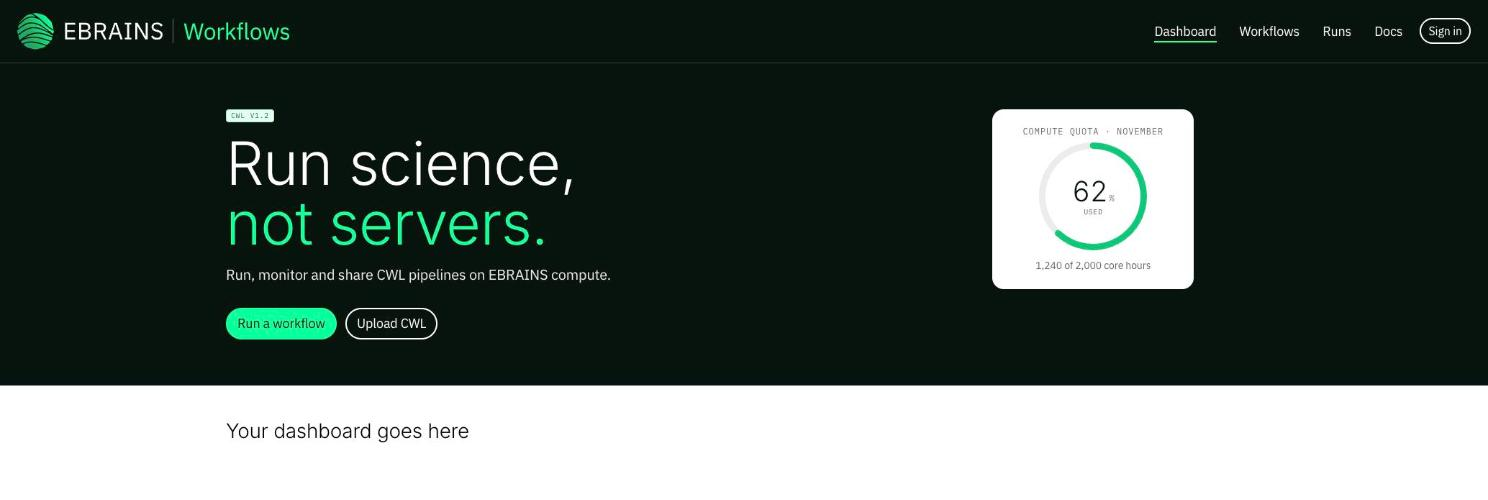
In this tutorial you build an EBRAINS app in its own repository: a plain Vite + React project that gets the design system from npm. There’s no Nx, no Tailwind configuration and nothing to clone. You end with the brand shell of the Workflows dashboard (header, hero, dialog, footer), ready to grow into the full page and to deploy.
Time to complete: 30 minutes
What you’ll learn: which packages an outside app needs, how to load the design system’s styles and components, and how to build and ship the result.
Working in the monorepo instead? Follow the UI Ecosystem path. Not sure which fits? See How to Integrate the Design System.
What You’ll Build
By the end of this tutorial, you’ll have:
- A React + TypeScript app with the EBRAINS header, a brand hero with a quota gauge, and the footer
- An “Upload CWL” dialog, opened from the hero
- A production build you can host anywhere that serves static files
Prerequisites
Before starting, make sure you have:
- Node.js 20 or later, and npm
- Basic React and TypeScript knowledge
Step 1: Create the project
Vite’s starter page comes with its own styles, which you won’t need. Delete src/index.css and src/App.css.
What you just did: created a standard React + TypeScript app. Nothing in it is EBRAINS-specific yet.
Step 2: Install the design system
| Package | What it gives you |
|---|---|
@ebrains/react | The components as React components (<EdsHeader>, <EdsButton>…). It brings @ebrains/components, the web components underneath, with their TypeScript types. |
@ebrains/assets | The prebuilt stylesheet: tokens, fonts, and every layout, type and colour class |
What you just did: pinned the versions so updates bring fixes and new components, never a breaking change: ^3.3 accepts any 3.x from 3.3, ~0.9.1 any 0.9.x from 0.9.1.
Step 3: Load the styles
Replace src/main.tsx:
In index.html, give the page its name: <title>Workflows · EBRAINS</title>.
What you just did: imported the whole design system’s CSS once. Vite bundles it with its fonts. You don’t register the components: @ebrains/react loads each one the first time it renders.
Step 4: Build the page shell
Replace src/App.tsx:
What you just did:
- Shell:
EdsHeaderwith your product name and links, andEdsFooterwith the EU funding statement and legal links. Every EBRAINS app has both. - Layout: a full-width dark band holding
container max-w-default mx-auto, split on the 12-columngrid-layout. These are the design system’s layout primitives, straight from the stylesheet. - Component data and methods:
linkstakes an array, anduseRef<HTMLEdsModalElement>gives you the dialog element, soopen()andclose()are typed calls.
Verify It Works
Expected result:
- The page looks like the image above, with no errors in the browser console
- Below 1024px wide, the header links move to a scrollable row under the bar
- Upload CWL opens the dialog; Cancel and the Escape key close it
npx tsc -bpasses, and a misspelled prop value such asintent="primay"is a type error
Step 5: Grow it into the dashboard
The rest of the page uses the same components and classes as the monorepo version, so the code is identical. Replace the placeholder <main> by following these steps of Build an EBRAINS Dashboard:
- Step 3: Figures, status and runs: an alert, a collapsible figures panel, a chart, a table and progress bars
- Step 4: Tabs and a support form
- Step 5: An upload dialog: the full version of your dialog, with a file drop zone and radio options
Step 6: Build and ship
npm run build writes static files to dist/. vite preview serves them locally, so you can check the production build before you ship it.
Any static host can serve dist/. To run it as a container on an EBRAINS VM, serve it with nginx:
Add a .dockerignore, so the build doesn’t copy your local node_modules and dist into the image:
To publish the image, see Publish Your First Docker Image.
What You Learned
In this tutorial, you:
- Installed
@ebrains/reactand@ebrains/assets, with version ranges that take fixes but no breaking changes - Loaded the prebuilt stylesheet once, with no Tailwind setup and no registration step
- Built the EBRAINS shell with layout classes and components, and called a component method through a typed
ref - Produced a static build and a container image
Next Steps
- Finish the page with steps 3–5 of Build an EBRAINS Dashboard
- Look up components on design.ebrains.eu, and try them in Storybook
- Solve common problems with the patterns: navigation, forms, notifications, empty and loading states
- Using Vue, or no framework? Start Your Own App on the design system site covers both
Troubleshooting
Problem: the components work, but there are no page margins and the hero isn’t split into columns.
Solution: your @ebrains/assets is older than 0.9.1, which lacks most layout classes. Run npm install @ebrains/assets@~0.9.1.
Problem: TypeScript: Cannot find name 'HTMLEdsModalElement', or props accept any value.
Solution: your @ebrains/react is older than 3.3.0, whose types don’t resolve outside the monorepo. Update with npm install @ebrains/react@^3.3. Until you can, type the ref as useRef<any>(null).
Problem: the page shows Vite’s purple starter styles.
Solution: delete src/index.css and src/App.css, and remove their imports (step 1).
Problem: components render with the right shape but the wrong fonts or colours.
Solution: check that src/main.tsx imports @ebrains/assets/styles/output.css (step 3).
Additional Resources
- How to Integrate the Design System: every setup, side by side
- Tailwind Class Reference: every class in the stylesheet
- Build Your First Page: the complete dashboard in plain HTML, with live previews